
Speakers and other electronics are popular products for customisation. UV flatbed printing makes it quick and easy to add designs to multiple products, from brand logos to band artwork and anything in between. UV flatbed printers offer a versatile and cost-effective solution for personalisation businesses looking to customise items made of a variety of materials, such as wood, plastic or metal.
As part of our series of how-to guides focusing on flatbed UV printing, this article will outline our process of personalising several mini speakers with different designs. We’ll guide you through the necessary steps from design preparation to print settings and post-processing techniques.
Equipment Used:
- VersaOBJECT MO-240 UV flatbed printer
- 6 identical black-plastic mini-speakers
- A laser-cut jig
- VersaWorks 6
- LV-290 laser-cutter
- Roland DG Connect
- Adobe Illustrator
The Artwork

- We designed some audio brand logos to print onto our mini speakers taking inspiration from popular brands in the market. It was important that they had the correct look and feel for the project and could showcase some of the special effects that a UV flatbed printer is capable of.
- We measured the speakers' dimensions in millimetres and set the artboard in Adobe Illustrator at 100% so the design would print at its measured size. We tend to use Adobe Illustrator to create design files but feel free to use whatever you are most comfortable with.
- Our audio brand logo was made of simple vector shapes and text, so it was easy to generate special effect layers like white and gloss ink layers. We used Illustrator to add a white ink layer to one of our designs by loading Versaworks Spot Colour Libraries and naming the layer RDG_WHITE so that the RIP could read the effect. We added a gloss layer to another design in much the same way, naming it RDG_GLOSS and colouring the areas appropriately.
- When using a white layer under CMYK, it helps to choke it around the edges either in the design phase or using the RIP pre-print. This ensures that no white will show at the edges of the print.
Preparing and Loading the Jig

We made a custom jig for this project so that the speakers would be held in place with the correct spacing when printed. It also meant that we could line up the design files perfectly with the items on the flatbed so we could be confident with our print accuracy. We used a laser cutter to create an accurate template for the speakers based on the file we created when making our design.
- We made a PDF file in Adobe Illustrator using the measurements from the design file. We designed the jig to fit the flatbed – 3 columns of 8 to print up to 24 items fit the flatbed well with appropriate margins between each item. We outlined the items in white so they could be seen clearly.
NB – We didn’t intend to fill the jig for this print project, but it was better for us to create one that would make the most of the printing space and only use the slots we needed.
- The base of the jig was made from a 10 mm board of MDF cut to fit the flatbed print surface. We used a 3 mm MDF board to make the top layer. We loaded it into a CO2 laser cutter and used it to cut out the shape of the speakers using the print outlines.
NB – Our laser cutter was too small to cut a board the size of our printing area, so we made it from two pieces and stuck them together on the baseboard.
- We used the shape offcuts, temporarily attached with double-sided tape, to help us align the two boards together to finish the jig. We then fixed the boards together using wood glue and an accelerator. We printed the top of the jig with black ink to help reduce the reflection from the UV light.
- We loaded the jig with the speakers, lined them up carefully and fit them firmly in place. Once the jig was full, we loaded it onto the printer’s flatbed. The jig aligned perfectly with the flatbed, so we were confident of the positioning, but you can use positioning pins and secure the jig with screws if you need more stability and accuracy.
Preparing the Print and Printing

As we were printing multiple items with different design files, we used Roland DG PrintAutoMate to help us automatically map our files to their related jig and printer. This is particularly useful for printing high volumes of items. As we were printing multiple items with different design files, we used Roland DG PrintAutoMate to help us automatically map our files to their related jig and printer. This is particularly useful for printing high volumes of items.
- We loaded the speaker design into PrintAutomate. PrintAutomate automatically detected the file name, the number of units we wanted to print, and the object dimensions. We then clicked on autofill to populate the jig.
- We clicked Print to send the job to Versaworks.
NB – While Roland machines are compatible with many popular RIPs, it’s usually best to use the software specifically designed for your device.
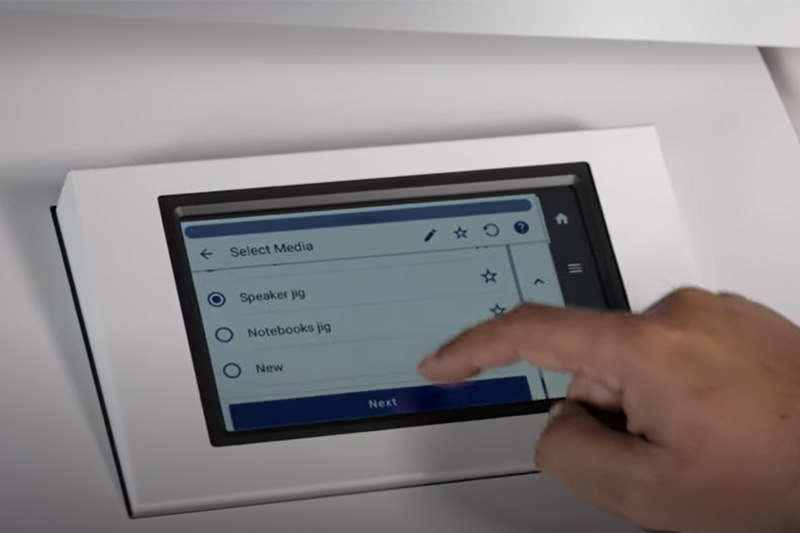
We selected the correct jig from the list on the Settings screen of our printer, pressed Print and waited for the print to be completed.
Conclusion
Once the print had finished, we were left with customised speakers with unique, eye-catching designs. The gloss logo used multiple layers to create a raised texture that really added to the effect. They were simple and quick to produce, and with the help of PrintAutoMate, we could have printed more with no additional steps.
Electronics make fantastic customised products. Whether you’re just adding a logo and some text like we did, or want to be even more creative, there are lots of ways to add value to a blank mini-speaker.
The jig setup really helped with speed and accuracy, but for smaller jobs, they needn’t be as complex as the one we created. Often a ball of putty will do.
If you’d like more information on anything mentioned in this article, please contact your Roland DG representative, or talk to an expert